i am the master of titles!
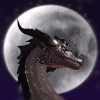
A small appreciation gift for sidian <3
she is so kind to me! When i started to upload more here, become active and opened commissions for the first time she featured me and helped me get a boost of views! also she helps me a lot around here. thank you again for this ;u;
I hope you like this, i think it's kind of cute and i like those colours =D
A small appreciation gift for
 sidian <3
she is so kind to me! When i started to upload more here, become active and opened commissions for the first time she featured me and helped me get a boost of views! also she helps me a lot around here. thank you again for this ;u;
I hope you like this, i think it's kind of cute and i like those colours =D
Category Artwork (Digital) / Animal related (non-anthro)
Species Dragon (Other)
Size 630 x 720px
File Size 383.4 kB
Wauw, it looks wonderful! Super cool. i really like how the line-art is still slightly sketchy. It gives lots of feeling to the drawing. :D
By the way, did you make this in Photoshop as well? If yes, how do you make the colours go over into each other so smoothly? Because I'm really having trouble with that in PS. >.>
By the way, did you make this in Photoshop as well? If yes, how do you make the colours go over into each other so smoothly? Because I'm really having trouble with that in PS. >.>
Cool. And not so much the background, I mean more in the face for instance, or on the shoulder. The colours blend really well with each other, so it looks smooth. When I try to do that in photoshop I can't get it to look like that, I always get harsh lines where it's light and where it's dark. And if I try to use the blur tool or the colour-mix tool I always get a horrible result, since I always want to have a seperate layer for the shading and lighting, in case I mess something up. In SAI it never was a problem, but my new tablet and SAI aren't best friends, so I had to start working with PS CS5. :P
But yes, the background looks pretty cool too. Very artsy and such and it nicely matches with the light on the character. :) Very very nice. ^_^
But yes, the background looks pretty cool too. Very artsy and such and it nicely matches with the light on the character. :) Very very nice. ^_^
I don't recommend using those tools you mentioned for blending, also no matter what keep the shading and lighting on seperate layers. I am not sure if you were talking about the blending of the shading or her fur markings - nevertheless those are made with a fuzzy edged brush on opacity of %80 or a bit more, I hope that helps :]]
Thank you. :) I wasn't talking about the fur though. I mean the part where the lighting goes over to shading. It's... How do you call that. Not cell-shading but the other one. I would call it smooth shading. So how exactly do you do that in photoshop? I just put some circles around the areas that I mean. http://i481.photobucket.com/albums/.....sidiangift.jpg
first of all, i line down the character- colour it with flat colours (in this case gray)- then fill in some markings like the underbelly, stripes etc.
when i am done, I duplicate that layer- set it (the one which is on top of course) on Multiply mode, change the colour to flat dull dark blue or red or whatever else you want- and start to erase with a fuzzy brush the parts where the light hits. after wards, i open a new blank layer- set it on Overlay and choose light vivid green/ yellow/pink/ etc. and use the same brush at the areas the light is the strongest- in this case it's on the nose bridge, shoulder, muscles and so on :3
hope that helps!
Aha, so that's the trick. Multiply and Overlay layers. :D Super-duper! Thank you so much for explaining that. Hopefully I'll be able to do that myself as well. After all, it's pretty hard to start working with a new program when you don't really know all the options. :P Heehee! So really, thank you for explaining and please keep up the wonderful work. :)

 FA+
FA+


Comments