 FA+
FA+
2756
Views
Views
257
Favorites
Favorites
Category
All / Fursuit
Species Dog (Other)
Size 989 x 1253
File Size 183.1 kB
Report this content
★
More from Matrices

")


Listed in Folders


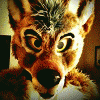
Zoe Husky (Trade with Temperance)
I am very happy to present to you all this finished Husky!
She'll be going to Canada, adopted by Temperance as part of a head trade that we did with eachother! Her name is Zoe!
This crafty Coyote is came to live with me, in exchange: http://www.furaffinity.net/view/4350585/ her name is Chelan. :3
This is an all-foam base with a non-balaclava liner, bowl/buckrum eye construction, Sculpy Ultralight was used for the teeth. The nose is a sculpted, painted, air-dry clay and is very light. The tongue is removable for more ventilation, or simply just to pose it in silly ways. There is also hidden vents out each ear.
I used brown, rust, short white, medium white and long white fur. As well as anti-pill fleece for the inner-ears, polyester blend for the tongue/mouth, black cording for the lips, and vinyl for the eyelids.
Some details were painted, the lips and around the nose specifically. And there are also several whisker dots embedded under the fur and trimmed to show. :3
More pictures can be found here:
http://pics.livejournal.com/matrice.....llery/0001gx9y
Aaaanyways, I'd love to answer any questions anyone has. I'm very proud of this creation!
She'll be going to Canada, adopted by
 Temperance as part of a head trade that we did with eachother! Her name is Zoe!
This crafty Coyote is came to live with me, in exchange: http://www.furaffinity.net/view/4350585/ her name is Chelan. :3
This is an all-foam base with a non-balaclava liner, bowl/buckrum eye construction, Sculpy Ultralight was used for the teeth. The nose is a sculpted, painted, air-dry clay and is very light. The tongue is removable for more ventilation, or simply just to pose it in silly ways. There is also hidden vents out each ear.
I used brown, rust, short white, medium white and long white fur. As well as anti-pill fleece for the inner-ears, polyester blend for the tongue/mouth, black cording for the lips, and vinyl for the eyelids.
Some details were painted, the lips and around the nose specifically. And there are also several whisker dots embedded under the fur and trimmed to show. :3
More pictures can be found here:
http://pics.livejournal.com/matrice.....llery/0001gx9y
Aaaanyways, I'd love to answer any questions anyone has. I'm very proud of this creation!
Category All / Fursuit
Species Dog (Other)
Size 989 x 1253px
File Size 183.1 kB
Listed in Folders


I'm a big fan of Krylon "acrylic Crystal Clear"
I always get the satin kind.
It advertises "dries in 10 minutes or less" which is a plus. And I always apply in a thiiin layer. Let dry, then apply another thiiiin layer, then let dry, another, and so on. I did two thin layers on each side of the irises in this case.
I hold them with a clothespin as I spray them
Pic of that: http://twitpic.com/2yneci


Man! Your stuff has come along way!
And, I do have several questions if you don't mind! :<
1. What type of stitch did you use?
2. What's the pattern for the lower jaw/front neck and back look like?
3. http://i52.tinypic.com/2nro4li.png
Here's a reaccuring problem with my pattern. The side of the muzzle and half of the cheek is all one piece, right? Well, as I sew from the nose tip towards the inner eye and finish it off, there is left over fabric past the seam which curls under said seam and makes it puff out a little bit, and if I try and snip it out, the fur area comes off ratty or I risk cutting the thread apart itself.
Should I choose a different pattern? And if so, how should I break up this part?
Sorry for the long question(s).
1! Most of the big seams are actually machine-sewn with a straight stitch. Little seams & tighter areas were sewn with a whipstitch.
Pic of that: http://www.matrices.net/fursuit/whipstitch.gif
Though sounds like you may need to try to use a Blanket stitch if you are having trouble with seams curling. It has a little more of an edge to it, but it is easier to keep uniform
Pic of blanket stitch: http://www.miss-laurence.co.uk/grap.....ket-stitch.gif
Video: http://www.youtube.com/watch?v=nJht13Bcw-U
Also pinning your pieces before sewing will help also.
2! Lower jaw is 2 pieces, left side, right side, that are actually a solid part of the cheek and muzzle area.
Pic of that: http://pics.livejournal.com/matrice.....c/0021qef6/g14
The jaw and the front of the muzzle (under where the nose goes) are pre-sewn in that photo.
The back of the head is one piece from the left cheek to the right cheek and does include the ears. (sorry no photo)
3! Sounds a lot like you may need to switch up your technique to start at the eye and then end at the snout, that way you can trim the excess at the front of the snout instead of in the center of your face. May help. I do a lot of trimming to fit my pieces as flat as possible before i sew and attach them.
If you don't want to undo allll of your hard work just to fix it, you can glue trouble areas as well. Use glue sparingly!
Hope I helped!


In mine, I do. Since this is a trade for temperance its up to her to install a fan or use one she may already have.
Since the fans I made I made probably 5 or more years ago and I switch them interchangably between my masks.
http://www.matrices.net/fursuit/fans.jpg They don't look this pristine anymore! lol!
temperance its up to her to install a fan or use one she may already have. Since the fans I made I made probably 5 or more years ago and I switch them interchangably between my masks.
http://www.matrices.net/fursuit/fans.jpg They don't look this pristine anymore! lol!


Your work always astounds me, Matrices! You have a style unlike anyone else and you put such fine detail and care into everything you do! You should be very proud!! I picture that suit and a large charity event and I can't help but hope he's destined for such a life.
I can see a little of Turbo in there.. heheh. He's a good model! Did he stay put for you to get references? :)
I can see a little of Turbo in there.. heheh. He's a good model! Did he stay put for you to get references? :)


Not a stupid question! (The only stupid question is an unasked one!)
http://pics.livejournal.com/matrice.....c/00200crd/g14
Here is what my foamwork looked like before I furred it. I made my foamwork that shape by layering up, bending and gluing the foam into that shape. It can also be cut out and carved, too.
http://pics.livejournal.com/matrice.....c/00200crd/g14
Here is what my foamwork looked like before I furred it. I made my foamwork that shape by layering up, bending and gluing the foam into that shape. It can also be cut out and carved, too.
Dont be afraid to overexaggerate a little bit! A few well-placed overexaggerations really bring out the personality in many costumes! Both realistic and toony.
The fur is really good at hiding the under foam, so thats where things like emphasizing the smile in the foamwork help out a lot!
The fur is really good at hiding the under foam, so thats where things like emphasizing the smile in the foamwork help out a lot!


Comments