 FA+
FA+
2179
Views
Views
40
Favorites
Favorites
Category
All / Transformation
Species Dragon (Other)
Size 975 x 1108
File Size 195.1 kB
Report this content
More from Seacigar


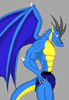
Oh good lord... finally got my Frankenstein computer running, and though I lost my art programs (the old hard drive won't function oddly enough) I managed to find a suitable replacement so far with the GIMP. It has shown to have silky smooth lines, making it ideal for inking... if I can color with it, I'm 100%. But as I usually do when I draw, I've strained my wrist and so a color job on this piece will have to wait.
Now for the image gimmick:much like the hidden ending in Pac-man, hackers found hidden data never before seen in the bowels of smash brothers brawl, involving a *Second* final smash for Nintendo underdog Pit (Kid Icarus). Much like a mix of Ganon's large transformation into an invincible beast mixed with Yoshi's high mobility and powerful projectile smashes, this technique was deemed far too broken to ever see the light of day, even in terms of final smashes. And lets not forget the copyright infringements here; what can be said: The junk data suggests Nintendo wanted to work with square, but sadly, nothing of the sort occurred.
As for the REAL story behind this, Take a look at Pit from Smash brothers brawl, then compare it side to side with a picture of Flammie, Secret of Mana's (a Squaresoft action RPG) "Dragon" and mount, AKA makeshift airship...
The two look eerily similar in the face, not to mention both sporting wings.
Don't forget now: if you like it, hate it, or otherwise have thoughts on the image, leave a comment: It's the main reason I bother posting art online in the first place! *craves attention@_@*
Category All / Transformation
Species Dragon (Other)
Size 975 x 1108px
File Size 195.1 kB
*nods* I'm impressed: you're repeating alot of what I learned from my art classes in phoenix: While the teachers seemed professional, I have no true claim on their fame or merit, but they showed me some neat tricks, so I can't rightly deny their savvy.
If Gimp can handle their tricks and yours, I should be doing well. This pic will be the first I color as a test.
If Gimp can handle their tricks and yours, I should be doing well. This pic will be the first I color as a test.


I've never taken any classes. :P
The latest versions of GIMP include a new variation on the lasso tool: It allows you to select point-by-point. This can be good for problem areas. To speed things up, you could try the paths tool. That's a little trick to start with - click, then "drag" a point to create two wings that guide the curvature of connecting lines. They have little squares that you grab to move the wings. Once you get the hang of it, it's pretty awesomely useful for quick, clean curves.
I always color on layers. I recommend strongly against trying to fill in the original drawing. Instead, make a couple new layers, then jump to the original to use the magic wand to select the area in question, then jump back to the new layer to fill in the color. You'll want to tighten up the leaks in your drawing bodies (like around those toe talons) before you try it.
Transparency is really useful. Use the eraser on different levels of opacity to help blend overlapping colors on separate layers. This is good to make shiny effects by hand - paint some white smudges on a blank layer (topmost), apply Gaussian blur at 20%, then erase on half opacity with a fuzzy brush tip until you have your desired shiny. Also blur again.

Comments