 FA+
FA+


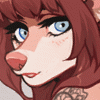
"The Hangout" Process GIF
FULL IMAGE: http://www.furaffinity.net/view/13736462/
Step One: Initial concept sketch. Super messy, feeling out composition and pose.
Step Two: Secondary sketch. Adding details, expression, clothes design.
Step Three: Final sketch. Refining everything so that I can easily trace over for the lineart.
Step Four: Lineart. After I'm done, I duplicate the lineart layer and blur it so it gives the lines some softness.
Step Five: Flats. I make a new layer for each colour to make it easier on myself later if I need to edit anything.
Step Six: Gradients! I start slapping down some multiply layers to begin establishing some lighting, making sure to keep the colour palette interesting and vibrant. I add some pattern overlays to the pillows.
Step Seven: On another multiply layer, I just go in with a hard brush and throw down the darkest shadows. On another layer, I use a soft brush on another multiply layer (in the same colour) to add some more gradients and soften some of the edges. I find having a combination of hard/soft edges makes the shading more dynamic.
Step Eight: More gradients as well as highlights. I use an overlay layer and add them sparingly to where the light would shine. Add some detail to the lamps.
Step Nine: Final touches! I alter the colour with an overlay layer, add some more highlights with a soft brush, make the lightsource glowy with a low-opacity luminosity layer and then add some light whisps of smoke with just a low opacity, blurring it in a couple areas. I also add some darkness around the edges of the image as well as blur them to draw more attention to the character.
----
If you have any questions about my process, let me know! I use Paint Tool SAI (and occasionally Photoshop for some edits)
Category All / All
Species Unspecified / Any
Size 504 x 662px
File Size 819.6 kB


Comments